Wondering how to master Jira’s vast capabilities for strategic project/product success?
Epics are the key to transforming tasks into visions for pivotal objectives.
In Agile project management, an agile epic is a significant body of work that can be divided into smaller tasks or user stories, helping maintain organizational clarity and support project goals while allowing flexibility in execution.
This guide demystifies crafting and leveraging epics, paired with Usersnap, to elevate product management efficiency and collaboration.
You can just dive in to navigate your project’s journey with precision and synergy.
How to Create Epics in Jira Epic Panel (Step by Step)
Here’s a detailed 5 steps guide on how to create epics in Jira:
- Log in to Jira: Open your web browser and navigate to your Jira instance. Log in with your credentials.
- Access the Project: Once logged in, locate and select the project you’re working on from the dashboard. This will take you to the project’s homepage.
- Navigate to the Backlog: Within the project’s homepage, find and click on the “Backlog” link. This will typically be located in the sidebar menu or at the top navigation bar, depending on your Jira configuration.
- Access the Epics Panel: In the backlog view, you should see a panel labeled “Epics” on the left-hand side. If it’s not visible, look for a dropdown menu or a settings icon to show/hide panels. The epic panel is crucial for managing epics, as it allows you to filter by Epic, create and manage child issues, and customize details associated with Epics.
- Adjust Board Settings: If the epic panel is not visible, you may need to adjust the board settings. Go to the board settings and enable the epic panel to ensure it is displayed in the backlog view.
How to Create Epic in Detail
- Click on “Create Epic”: Within the Epics panel, there should be an option to “Create Epic” or a similar button. Click on it to initiate the new epic creation process.
- Epic Name: Provide a descriptive name for your epic. This should briefly summarize the goal or theme of the epic.
- Epic Summary (optional): Write a summary that provides more context about the epic. This can include additional details that may not fit in the name field.
- Epic Link (optional): If your epic is related to another issue or epic, you can link them here using Jira’s linking functionality.
- Assignee (optional): Assign an individual or team responsible for the epic. This could be you as the product manager or a specific development team.
- Labels (optional): Add relevant labels to categorize the epic. This could include tags like “UI/UX,” “Backend,” “Feature”, etc.
- Description (optional): Provide a detailed description of the epic. Include information such as the business value, objectives, scope, and any other relevant details that will help stakeholders understand the epic’s purpose.
- Set Epic Priority (optional): If necessary, you can prioritize the epic by adjusting its priority level. This helps in organizing work and communicating its importance to the team.
- Add Epic to Backlog: Once you’ve filled in all the necessary details, click on the “Create” or “Save” button to create the epic. It will now be added to your project’s backlog and visible to the team.
- Review and Manage Epics: After creating the epic, you can go back to the backlog view to see it listed among other epics. From here, you can further manage and organize epics by dragging and dropping them to prioritize, assigning tasks to epics, adding dependencies, and more.
- Communicate with the Team: Ensure you communicate the newly created epic to your team members. You can do this through team meetings, emails, or by using Jira’s @mention feature to notify relevant team members directly within Jira.
In case you wish to delete the Epic, Open the epic, click on the ellipsis (more options), and select “Delete Epic.” Confirm the deletion when prompted.
I have shared a few snapshots of Jira so that you can assimilate yourself to the steps.


Example of an Epic in Jira
To illustrate the concept of an epic in Jira, let’s explore a real-world scenario: the development of a new feature aimed at enhancing user engagement within a digital platform.
This epic, titled “Enhance User Engagement Through Gamification,” would encompass a variety of tasks, such as the integration of a rewards system, the introduction of interactive challenges, and the implementation of a leaderboard.
Each task under this epic contributes to the overarching goal of increasing user interaction and satisfaction, demonstrating how epics serve as a blueprint for achieving complex project objectives.
These tasks can be broken down into child issues and called user stories to better manage the work.

Managing Epics in Jira
Let’s understand how PMs can manage the Epics effectively:
Organizing and Prioritizing Epics within Jira Projects
- Navigate to the backlog or board view in your Jira project.
- Use drag-and-drop functionality to organize epics by priority. Simply click on an epic and drag it to the desired position.
- Utilize Jira’s ranking feature to assign a numerical priority to each epic. This helps in determining the order of work.
- Agile project management benefits from organizing and prioritizing epics, as it helps break down large tasks into manageable user stories, facilitating better organization and prioritization in workflow.
Assigning Epics to Specific Team Members or Teams
- Open the epic you want to assign.
- Look for the “Assignee” field and select the appropriate team member or team responsible for the epic.
- Alternatively, you can use Jira’s @mention feature within the epic’s description or comments to notify specific team members about their involvement.


Tracking Progress and Updates for Each Epic
Regularly update the epic’s status using Jira’s workflow statuses, such as “To Do,” “In Progress,” and “Done,” to track its progress.
Break down work further by adding sub-tasks or linked issues to the epic for more granular tracking.
Leverage Jira’s reporting and dashboard features, like burndown charts and velocity reports, to monitor progress across epics.
Encourage team members to provide updates and comments to keep everyone informed of progress, challenges, and changes. Managing multiple epics within a single project helps teams prioritize tasks and track progress across broader initiatives.

User Stories vs. Jira Epics
Understanding the difference between user stories and Jira epics is crucial for effective product management and planning.
Here’s a breakdown of each:
User Stories
User stories are small, manageable units of work that describe a specific piece of functionality from the perspective of the end user.
They typically represent a single feature or requirement that provides value to the user and helps guide the development process.
Each user story is detailed with acceptance criteria, which outline the conditions that must be met for the story to be considered complete and to ensure it satisfies the user’s needs.
Ownership of user stories usually falls to individual team members, and they are often implemented within a single sprint or iteration.
For example, a typical user story might be: “As a user, I want to be able to reset my password to regain access to my account.“
Jira Epics
Epics represent larger bodies of work that consist of multiple user stories and can span across several sprints or even multiple releases.
They are primarily used for high-level planning and organizing related work, offering a way to group together user stories that contribute to a common objective.
Since epics involve a longer timeframe, they often need to be broken down into smaller, actionable user stories that can be tackled in individual sprints.
Epics play a crucial role in aligning development efforts with broader strategic goals and initiatives. For example, an epic might be titled “Enhance User Engagement Through Gamification,” which would include multiple user stories and sub-tasks, all contributing to the achievement of a larger, overarching goal.
Key Differences
- Scope: User stories focus on individual features or requirements, while epics encompass larger bodies of work.
- Granularity: User stories are granular and specific, whereas epics are high-level and more abstract.
- Ownership: User stories are typically owned by individual team members, whereas epics may involve multiple teams or stakeholders.
- Planning Horizon: User stories are implemented within a single sprint, while epics may span multiple sprints or releases.
- Epic Type: When creating an epic, it is important to specify the epic type in the Epics Panel Link to ensure proper categorization and management.
Best Practices for Using Jira Epics in Agile Project Management
Here are some best practices along with strategies for breaking down epics into smaller, manageable tasks:
Epics should be clearly defined to align with project/product goals and capture significant deliverables. They must be broken into smaller, manageable tasks or user stories that are independently deliverable and linked using the Epic panel in Backlogs.
Prioritize epics based on business value, urgency, and dependencies, and refine them continuously as the project evolves. Cross-functional collaboration is key to ensuring all teams contribute to the epic’s objectives. Since epics can span multiple projects, they enable efficient tracking and organization through sprints.
Advanced Features and Customization Options for Jira Epics
I am listing down the 4 key advanced features which PMs can leverage:
- Epics Relationships and Dependencies: Utilize Jira’s advanced features to establish relationships and dependencies between epics. Link epics to show parent-child relationships or dependencies between related epics, allowing for better visibility and management of complex project structures. PFB of quick snapshot of an Epic linked to another Epic as a dependency.
- Custom Fields and Attributes: Customize epics by adding custom fields and attributes to capture specific project requirements or workflow details. Tailor epics to fit unique project needs by adding fields such as priority, effort estimation, or custom tags, enhancing clarity and organization. It is important to specify the epic type when setting up a new epic in the Epics Panel Link to ensure proper categorization and management. For instance, in the below Epic, I have added “Sprint” as the custom field.
- Workflow Automation: Leverage Jira’s automation capabilities to streamline epic management processes. Automate workflows to trigger actions based on predefined conditions, such as automatically transitioning epics through different stages or notifying stakeholders of status changes, improving efficiency and reducing manual overhead.
- Reporting and Analytics: Utilize Jira’s reporting and analytics features to gain insights into epic progress, performance, and trends. Generate custom reports and dashboards to track key metrics, monitor epic status, and identify areas for improvement, facilitating data-driven decision-making and continuous optimization.

Jira Epic Template and Integrations
To enhance the functionality and efficiency of using Jira Epics, integrating with other tools can be incredibly beneficial.
Jira Epic Template from Usersnap
The template typically includes fields such as the Epic Name, Summary, Description, Acceptance Criteria, and any relevant Attachments or Links. It serves as a blueprint for creating new Epics, ensuring that all necessary information is captured and clearly communicated. To create an epic using the template, simply fill in the required fields and follow the outlined steps to establish the epic within your Jira project.
For product managers, a well-defined Jira Epic Template can:
- Improve Clarity: Clearly define what the epic aims to achieve, the problem it addresses, and its impact on the product or customers.
- Enhance Planning: Facilitate better planning and estimation by breaking down large tasks into manageable units.
- Streamline Communication: Ensure that everyone involved has a clear understanding of the epic’s objectives and requirements.
While the specific template can be customized to meet the needs of each team or project, the core components should always aim to provide a comprehensive overview of Epic’s goals and requirements.

- Integrating Jira Epics with other tools can significantly enhance their functionality and provide a more seamless workflow for product teams.
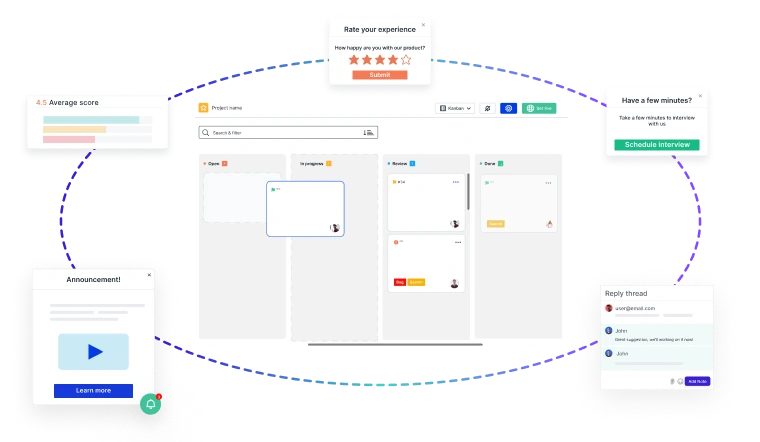
- One such integration is the two-way sync with Usersnap, a tool built for bug reporting for Jira and user feedback collection, enabling direct communication between the two platforms. This integration allows for direct communication between Usersnap and Jira, enabling feedback and bug reports collected through Usersnap to be automatically created as issues in Jira.

Key Benefits of Integration
Automated feedback loops instantly turn customer feedback or reported issues into actionable Jira tickets, reducing manual effort and ensuring no important feedback is missed.
This enhances team collaboration by providing real-time feedback and bug reports within the Jira workflow.
Additionally, teams can streamline prioritization by focusing on issues based on customer feedback and bug severity directly in Jira.
How to Integrate it
Start by setting up a Usersnap account and configuring it to capture the specific types of feedback or reports you need.
Next, install the Jira 2-way sync integration from the Atlassian Marketplace, following the steps to link your Jira and Usersnap accounts. Configure the sync settings to map Usersnap feedback to the appropriate Jira project fields or issue types.
Finally, test the integration with a few feedback items to ensure they sync correctly and appear as issues in Jira.
For PMs, leveraging a Jira Epic Template alongside strategic integrations like Usersnap can dramatically improve the efficiency and effectiveness of product development cycles.
Accelerate Issue Resolution with Visual Bug Reporting
Identify, capture, and resolve issues faster with screen recordings, screenshots, and contextual feedback—seamlessly integrated into your product development lifecycle.
And if you’re ready to try out a visual bug tracking and feedback solution, Usersnap offers a free trial. Sign up today or book a demo with our feedback specialists.